You are here: TSM SmartClient Menu Options – Interfaces > Conversion File
_________________________________________________________________________________________________
Conversion File
The Conversion File interface screen is used to facilitate the importing process of various files into TSM. Those files load data into TSM so that transactions can be created, indicative data updated, investment data updated, etc. The file is created using the format from the Profile Maintenance screen, and must then be uploaded into TSM through File>Upload prior to using the Conversion File screen.
How to access the Conversion File screen
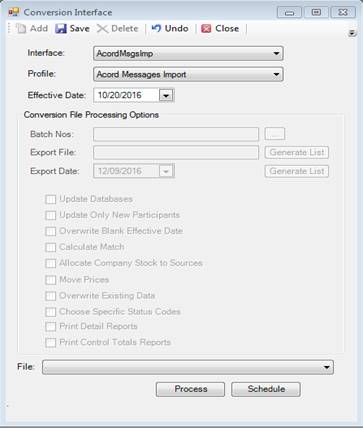
Click the Interfaces menu, then click Conversion File. The Conversion Interface screen appears.
How to use the Conversion Interface screen
After the applicable file has been created and uploaded, you must then use the Conversion Interface screen and complete the following steps to finish the import process.
1. Click Interfaces then Conversion File. The Conversion Interface screen appears.
2. Select the Interface you want to run.
3. Select the Profile for that Interface that you are using.
4. Enter the Effective Date.
5. Enter the Batch Nos, if applicable, by clicking the ellipsis (![]() ) and choosing the
applicable batch numbers that apply to your process.
) and choosing the
applicable batch numbers that apply to your process.
6. Enter the Export File name and Export Date, if applicable.
7. Click any of the applicable checkboxes:
- Update Databases
- Update Only New Participants
- Overwrite Blank Effective Date
- Move Prices
- Overwrite Existing Data
- Choose Specific Status Codes
- Print Detail Reports
- Print Control Totals Reports
8. Choose the File you previously uploaded that applies to the process.
9. Click Schedule, if your process requires you to schedule the file processing, then select the scheduled data. Stop here if you scheduled a job to process.
10. Click Process. You are directed to the Job Queue for results and/or reports. Some reports may appear automatically.
Explanation of Fields
|
Field Name |
Field Description |
|
Interface |
The Interface is essentially the function or task that you are uploading. For example, CONV-PART is intended to upload a list of participant indicative (or census) data into TSM. |
|
Profile |
The format of the Interface you are using. Both Interface and Profiles are setup and defined under Profile Maintenance. |
|
Effective Date |
The date the data is effective for. |
|
Batch Nos |
This is not a required
field, as it only applies to certain interfaces, but if you’ve chosen the batch
numbers (after you’ve clicked the ellipsis |
|
Export File |
This is not a required field, as it only applies to certain interfaces. You must click the Generate List button to display the file you are exporting. |
|
Export Date |
Not a required field, as it only applies to certain interfaces, and is typically same data as the current date. |
|
Update Databases |
This checkbox is ghosted if it does not apply to the chosen Interface. When checked, it updates TSM with the data in the import, if the import was successful. Do not check this box if not ready to process the file, and instead only want to view a report of the data that would be loaded, if the file were processed at this time. |
|
Update Only New Participants |
This checkbox is ghosted if it does not apply to the chosen Interface. When checked, it updates TSM with the data in the import only for new participants, if the import was successful. |
|
Overwrite Blank Effective Date |
This checkbox is ghosted if it does not apply to the chosen Interface. When checked, it automatically fills in the current date if the effective date is blank. |
|
Move Prices |
You cannot click this checkbox if it does not apply to the chosen interface. This checkbox is intended to load fund/model share prices into TSM, when applicable. |
|
Overwrite Existing Data |
This checkbox does not apply to all interfaces. When checked, this will overwrite any existing data in TSM with the data on the import you are using. |
|
Choose Specific Status Codes |
This checkbox is ghosted if it does not apply to the chosen Interface. If you are able to check this box, a “Choose Status Codes” screen appears for you to select various codes that apply to the import/transaction. In addition, you may have a Tran Type box appear for options to choose from as well. |
|
Print Detail Reports |
You cannot click this checkbox if it does not apply to the chosen Interface. When this option is chosen, you should see a detailed report after you finish the import process. Typically this report either automatically appears or you may need to view the report in the Job Queue. |
|
Print Control Totals Reports |
This checkbox is ghosted if it does not apply to the chosen Interface. When this option is chosen, you should see a detailed report after you finish the import process. Typically this report either automatically appears or you may need to view the report in the Job Queue. |
|
Tran Type |
This box only appears for certain interfaces. You have the option to choose DIV, EARN, FEE, +(Fee) and Sub Type, if applicable to that import/transaction. |
|
File |
You must choose the file that you previously imported (by using the File>Upload process). This field typically displays the most recent interface that was uploaded for the process, however you must ensure this is the exact file you are using for the import. |
|
Process |
Click the Process button once you are ready to initiate the processing of the file you uploaded. |
|
Schedule |
Click Schedule if you want to schedule the processing of the imported file. The Job Scheduler screen appears for you to select the schedule information for that process. |
|
Calculate Match & Allocate Company Stock to Sources |
These options are not currently used |