You
are here: TSM SmartClient Menu Options > Transactions > Distributions > Withdrawals
______________________________________________________________________________________________________
Withdrawals
The Withdrawals screen is used to process a partial distribution if/when the participant is no longer an employee, or for an in-service withdrawal when a participant qualifies to remove a portion of money from his/her account while still employed. As a default, the Withdrawals screen is used to remove only a portion of all funds from the participants account, typically in the form of a Required Minimum Distribution, installment payment, hardship or in-service withdrawal. If the full account is requested, a Termination process should be selected.
How to Access the Withdrawals Screen
On the Transactions menu, point to Distributions and then select Withdrawals. The Withdrawals window displays.
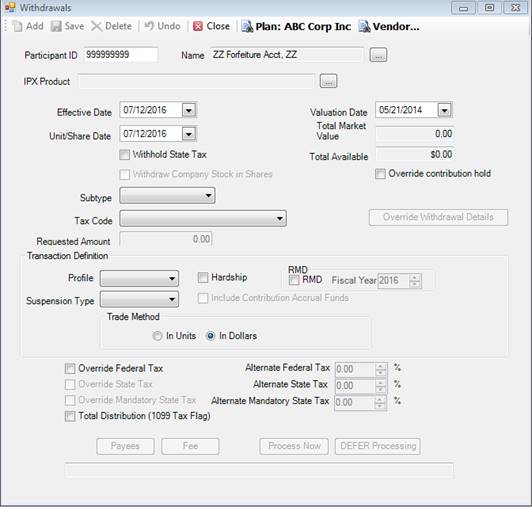
How to Use the Withdrawals Screen
Use the following process after it has
been determined that the withdrawal/distribution documentation is in good
order.
1. Use Transaction Inquiry to look for all pending transactions (ex. Contributions, dividends, etc.) for that person.
a) Click Inquiry, Transaction Inquiry, select the Plan (at top), click the ellipsis (…) to search for and select the participant, change From Date and To Date to the past one month (this is an estimate as it should encompass anything pending that may apply), click Run Query.
b) If there are any pending transactions, stop here to investigate if it will affect the withdrawal. If no pending transactions, continue to the next step.
2. Click Transactions, Distributions, Withdrawals. The Withdrawals screen appears.
3. Search for the correct Plan, participant and product.
4. Ensure the Effective Date and Unit/Share Date is the current business day.
5. Confirm the previous business date is in the Valuation Date field.
6. Click the Withhold State Tax box, if applicable.
7. Click the drop down for Tax Code and choose the appropriate tax reporting reason.
8. Enter the amount of the withdrawal or distribution in the Requested Amount field. This amount cannot exceed the Total Available.
9. If the request is for a Required Minimum Distribution, check the RMD box and confirm/choose the year the RMD is being processed.
10. If the request is for a hardship withdrawal, check the Hardship checkbox, and enter the Suspension Type.
11. Click the In Dollars button.
12. Click the Override Federal Tax if the participant wants more Federal taxes withheld for the rollover eligible withdrawal/distribution. You must then enter the new federal amount percentage in the Alternate Federal Tax field.
13. Click the Override State Tax if the participant wants state taxes withheld for a non-mandatory state. This box only appears if the participant lives in a non-mandatory state. You must then enter the state tax percentage to be withheld in the Alternate State Tax field.
14. Click the Override Mandatory State Tax if the participant wants state taxes withheld for a mandatory state. This box only appears if the participant resides in a state that requires state tax to be withheld. You must then enter the state tax percentage to be withheld in the Alternate State Tax field, which must be more than the mandatory state tax amount.
15. Click Payees and enter institution information if the participant wants the check made payable to an institution or wired to a bank or institution.
16. Click the Fee button if a fee for the transaction needs to be input. You must then enter the Fee Option, fee Amount, then click Apply.
17. Click Process NOW. Confirm there are no errors or reminders (for example, if you want to default outstanding loans).
Follow the remaining preliminary processes for trading the Withdrawal, which will include the following:
1. Click Trading, Batch Trading Process. The Batch Trading Process screen appears.
2. Choose the Plan from the Plan ID drop down, and change the From and To dates to today’s date (or whatever date the withdrawal was entered into the system).
3. Click Process Selection. The withdrawal appears in the box below, and is listed per investment, per transaction type. Ensure the Total$ equals the amount of the withdrawal(s).
4. Select each withdrawal entry in the Report column.
5. Click Create/Update Batch.
6. Click Process/Report Batch. A message appears indicating there is a report in the Job Queue.
7. Go to the Job Queue to view the report and ensure there is a batch number.
8. Click Trading, Batch Trading Export. This should show all plans batch reporting for that day. Confirm the withdrawal’s batch report number is listed.
9. Follow all other procedures for trading transactions at the end of the day, as well as all internal processes to deliver the withdrawal/distribution proceeds to the participant.
Explanation
of Fields
Note: If a field is
not mentioned below, it is not currently used on the Withdrawals screen.
|
Field Name |
Field Description |
Required/Optional |
|
Plan, Participant and Product |
These fields are all chosen based on the participant you are submitting the withdrawal/distribution. |
Required |
|
Effective Date |
The date the withdrawal/distribution proceeds will be traded. This defaults to current day. |
Required |
|
Unit/Share Date |
The date the withdrawal/distribution will be traded. This defaults to the current day. |
Required |
|
Withhold State Tax |
Select this box to withhold state taxes, which will use the state tax table (Setup>System>Tax). |
Optional |
|
Tax Code |
Select the tax code that is applicable to the distribution. The tax code selected determines how the distribution is reported to the IRS. |
Required |
|
Requested Amount |
The amount that is requested and that qualifies for the withdrawal/distribution. |
Required |
|
Hardship & Suspension Type |
This checkbox is checked if the withdrawal is a hardship withdrawal. The Total Available is updated once this box is checked. You must also choose the suspension type for the hardship withdrawal, since contributions should cease if the participant requests a hardship. |
Optional |
|
RMD & Fiscal Year |
These options are checked if the request is for a Required Minimum Distribution. The Fiscal year |
Optional |
|
In Dollars/In Units |
The default is to process the withdrawal in dollars. If the participant requests a specific unit amount, this can also be chosen, with the exception of a hardship withdrawal. |
Required |
|
Override Federal Tax / Alternate Federal Tax |
Choose the Override Federal Tax if the participant wants more than the required federal tax withheld on his/her rollover eligible withdrawal/distribution. This field only appears for non-hardship withdrawals. You must then enter the percentage in the Alternate Federal Tax field. |
Optional |
|
Override State Tax/Alternate State Tax |
Choose the Override State Tax if the participant wants state tax withheld on his/her rollover eligible withdrawal/distribution. This field only appears for non-mandatory state tax states. You must then enter the percentage in the Alternate State Tax field. |
Optional |
|
Override Mandatory State Tax/Alternate Mandatory State Tax |
Choose the Override Mandatory State Tax if the participant wants more than the mandatory state tax withheld on his/her rollover eligible withdrawal/distribution. This field only appears if the participants address is in a mandatory state. You must then enter the percentage in the Alternate Mandatory State Tax field. |
Optional |
|
Payees |
The Payees button is used to enter the destination of a withdrawal/distribution proceeds, including overnight delivery, wire, etc. details. You can also enter/confirm the delivery address for the 1099. If there are no special instructions, and the check is being mailed to the participant’s address on file, you do not need to click this button. After you click the Payees button, enter the payee destination information then click Save. |
Optional |
|
Fee |
Click the Fee button if a fee should be charged for this transaction. Standard transaction fees may have already been setup for the Plan (Setup>Transaction Rules>Transaction Fees), so only use this button if not already setup for the Plan and a fee needs to be assessed for the transaction. When using the Fee button, select the Fee Option, enter the Amount or Percentage, then click Apply. |
Optional |
|
Process NOW |
You must click this button to create the withdrawal/distribution transaction so that the proceeds can be traded at the next business day’s prices. |
Required |
|
Total Available |
Indicates the amount available for the distribution/withdrawal chosen. The amount available is determined by the money type setup. For example, if an employee pre-tax source is not available for a hardship withdrawal in the Plan, then the amount available reflects that calculation accordingly. This field does not, however, calculate a RMD for a participant. |
Informational |
|
|
|
|