How to Run Statements
Use this procedure to generate statements, mailing labels, register reports, investment fund and FICA taxable reports by Plan or Participant for a user-defined statement period. You can apply a Run Sort from the list.
1. Access the Statement Run option. On the Statements menu, click Statement Run. The Statement Run window displays.
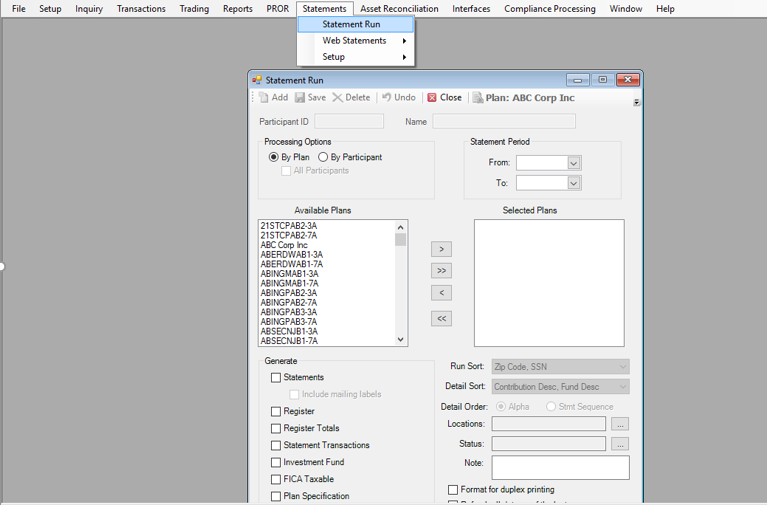
2. Select how you want to process the statement, By Plan or By Participant. If you select By Participant, the Participant ID field, Name field and All Participants options become available. Select the desired Participant from the Participant Search list or select the All Participants check box to run the statements for all participants.
3. Enter the Statement Period. TSM SmartClient will use the entered price/unit values for the specified From/To dates. If one or both of the dates are non-business days, TSM SmartClient will automatically revert to the last business day's price/unit values. For example, if the From date entered is 12/30/2006 (a Saturday), TSM SmartClient will automatically apply the price/unit value of 12/29/2006 (a Friday, which was the last business day).
4.
If you are processing
the statements By Plan, select the
Plans you want to include by highlighting the Plan(s) in the ‘Available
Plans’ box and clicking ![]() to move those Plans to the ‘Selected Plans’
box.
to move those Plans to the ‘Selected Plans’
box.
5. Specify the printouts you want to Generate by selecting the check box next to the corresponding option.
Statements will create the statement assigned to the selected plan(s). If you select Statements, you can also produce mailing labels by selecting the check box.
Register will create a report reflecting financial activity by transaction type on a participant level for the statement period date range. Select the Detail Sort to define the data reflected on this report.
Register Totals will create a report summarizing financial activity by fund, by transaction type for a plan or individual participant for the statement period date range. Select the Detail Sort to define the data reflected on this report.
Statement Transactions will create a report that displays detailed transactional activity by investment fund for any transaction processed during the selected statement period on a participant or plan level.
Investment Fund will create a report on a plan level reflecting fund balances by transaction type for the selected statement period.
FICA Taxable will create a report reflecting the taxable earnings for the participant for the selected statement period.
Plan Specification will create a report that displays the specifications of the Plan, such as, Plan Information, Plan Eligibility, Plan Loan Provisions, Plan Contact, Plan Vesting Schedule, and Funds being Used in Plan.
Loan Report will create a report by Plan and participant that displays the details of any outstanding loans.
Newkirk – Not currently used. Please do NOT select this option.
Fee Disclosure Statement - Not currently used. Please do NOT select this option.
6. Select the Run Sort, which specifies the order in which the statements will be processed, for example, by Location, Last Name.
7. Select an additional Detail Sort and Detail Order for the Register and Register Totals reports.
8.
If desired, select a Location to limit the statements to
generate, or reports for participants, to one or more locations. If no location
is selected, TSM SmartClient uses all locations. Click on ![]() to
display the Locations dialog box. Here you can select the locations to include.
to
display the Locations dialog box. Here you can select the locations to include.
9.
Status - You can limit the statements to include
transactions in one or more statuses. If no status is selected, TSM
SmartClient includes all statuses.
Click on ![]() to
display the Status dialog box. Here you can select the statuses to include.
to
display the Status dialog box. Here you can select the statuses to include.
10.Use the Note feature to display a message at the bottom of a participant’s statement. The message will appear on the last page of each participant’s basic statement. An example of where the note option will appear on a statement follows:
11.Select the Format for Duplex Printing check box to format the statements for duplex printing. TSM SmartClient will insert a blank page with the text, ‘This page intentionally left blank’, if the number of pages for an individual statement ends on an odd number. This assures that the beginning of the next statement begins on page #1. For example, if a participant’s statement totaled (3) pages, TSM SmartClient would automatically produce a blank page (page #4). And the beginning of the next statement will revert back to page one. This is a useful feature when clients need to print and sort their statements prior to distribution. Your printer will need to be configured to utilize this feature.
12.Select the Refresh all data as of the last run check box to update the statement or report file if participant data was revised since the first statement date range file was created.
Example:
The administrator for Plan ABC 401k Plan completes all her administrative tasks and decides to run its quarterly statement. The administrator enters a statement date range of 10/01/2006 - 12/31/2006 and processes the statements.
Since this is the first time the date range has been selected for this plan, TSM SmartClient will gather all the transactional information (within this date range) and create a file. This is the file that will be used for all future requests for this date range. There is no need to select the Refresh all data as of the last run option initially.
The administrator realizes AFTER the statements and/or reports have been run that she needs to make an adjustment that affects the financial reporting on the statement and/or register reports and will need to re-run the statements and/or reports. The administrator would simply post or save the changes on TSM SmartClient and then re-run the statements and/or reports. At this point she will need to select the Refresh all data as of the last run check box before processing. TSM SmartClient will gather all the quarterly (or selected date range) transactional detail including any adjustments since the last data refresh and create a new file or database that will be used to produce revised statements or reports.
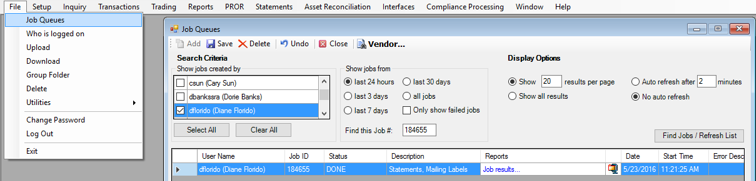
13.Select the Show Reports in Queue to view the statement(s) and/or report(s) under File > Job Queues (‘Job results…’ link).
14.Select Zip Reports to download a zipped file
containing the statement(s) and/or report(s) under File > Job Queues (![]() icon).
icon).
Note: At least one of these options: Show Reports in Queue or Zip Reports must be selected.
15.Select Include only Paper Statement recipients to generate statements for paper statement recipients only.
16.Click <Process> to generate the statement(s) and/or report(s) immediately, or click <Schedule> to schedule a future date/time for the statement(s) and/or report(s) to be generated.
17.If Show Reports in Queue was selected, go to File > Job Queues, and click on the ‘Job results…’ link under the ‘Reports’ column to view the statement(s)/report(s). If Zip Reports was selected, you will see a zipped file icon that you can click to download the statement(s)/report(s).