__________________________________________________________________________________
How to Setup a New Investment Firm/Agency
This document provides a quick reference for adding a new agency/investment firm to the IPX platform using TSM SmartClient.
Summary:
- Create Investment Firm (Setup > Investment Firms > Investment Firm).
- Create Investment Firm Selling Agreement with Carrier (Setup > Investment Firms > Investment Firm Carrier Agency List).
- (Mutual Funds Only) Create Fund Level Selling Agreements (Setup > Investment Firm > Selling Agreements).
- Approve Specific Carrier Products for Firm to Sell (Setup > Investment Firms > Investment Firm).
- Approve Carrier Products in the Plan (Setup > Funds > Plan Authorization).
- Approve Agencies in the Plan (Setup > Funds > Plan Authorization).
- Approve Agents in the Plan (Setup > Funds > Plan Authorization).
Important Note: For an annuity agency, the agency name and SSN must already be present in the ACORD distributor profile (DP) message that is transmitted from the IPipeline AFFIRM system to IPX.
- Log into TSM SmartClient.
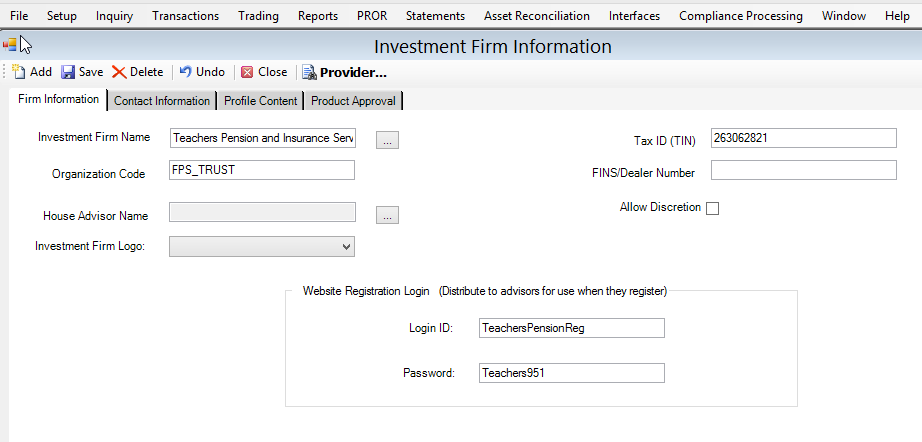
- The first step is to create the agency/investment firm. Go to Setup > Investment Firms > Investment Firm.
- Click the <Add> button in the upper left corner of the screen.
- Set the following values:
- Investment Firm Name.
- Organization Code: Set to FPS_TRUST for agencies that sell for annuity carriers.
- Tax ID (TIN)
- Login ID: This is the master User ID that new agents will use to register on IPX.
- Password: This is the master password that new agents will use to register on IPX.
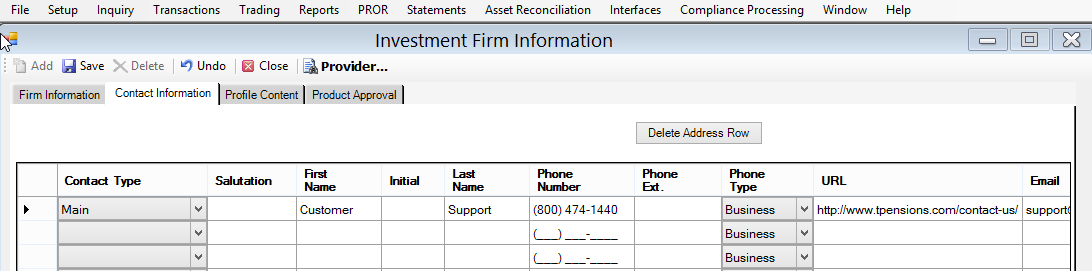
- Click the [Contact Information] tab.
- Enter the “Main” contact information (name, address, phone, etc.).
- If you have firm profile text (will show up in IPX), then add it on the [Profile Content] tab.
- Click <Save>.
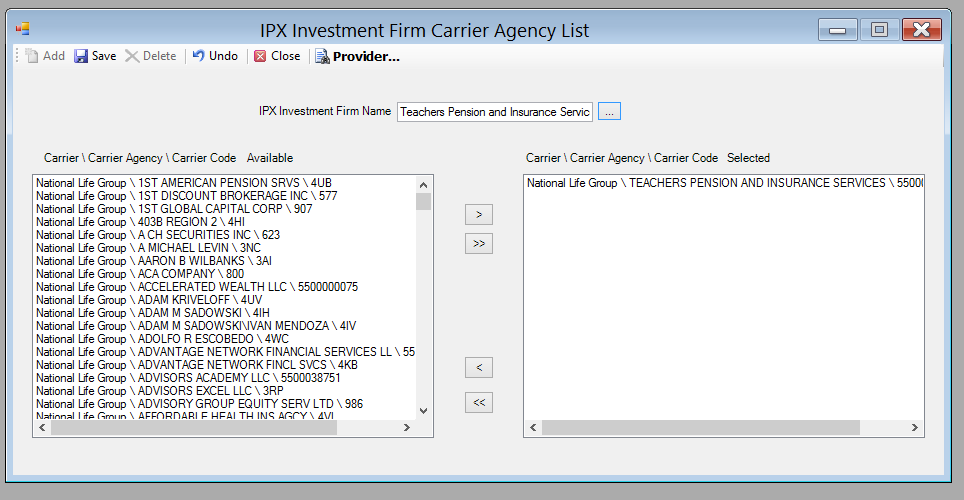
- The next step is to add an IPX selling agreement between the investment firm and any carrier products that they will sell. Go to Setup > Investment Firms > Investment Firm Carrier Agency List.
- Click the […] button next to “IPX Investment Firm Name” field.
- Find the agency you just created and highlight it by clicking on that row.
- Click <Select>.
- Use the >, >>, <, << arrows to move the desired carrier-agency/firm relationships into the right hand box. These values come from the DP mentioned above. ONLY MOVE ONE. If you need more than one, then set up separate investment firms for them.
.
- At this point, the annuity carrier distributor profile (DP) must be re-loaded into IPX before you proceed. It is automatically loaded each morning, so wait until tomorrow morning to complete the remaining steps. If you do not wish to wait, then you can also request that somebody with Switchboard access manually re-upload yesterday’s DP file.
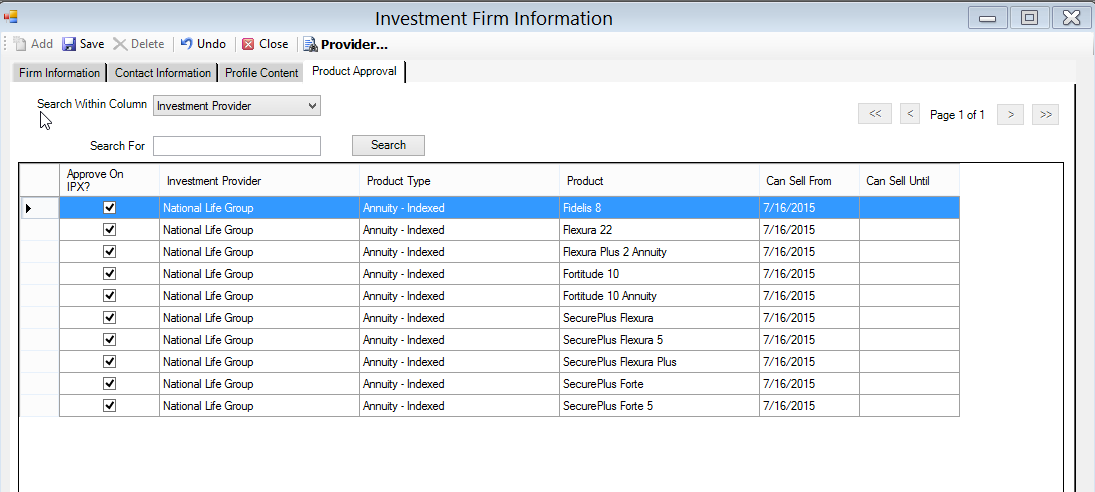
- The next step is to go back to the investment firm and agree to sell specific products offered by the product providers selected above. Go to Setup > Investment Firms > Investment Firm and select the [Product Approval] tab.
- Check the “Approve on IPX” checkbox for the desired products.
- The next step is to select the products that are approved by the plan. Go to Setup > Funds > Plan Authorization.
- You may see a screen that has no products listed in the table at the bottom of the window, or there may already be some products listed.
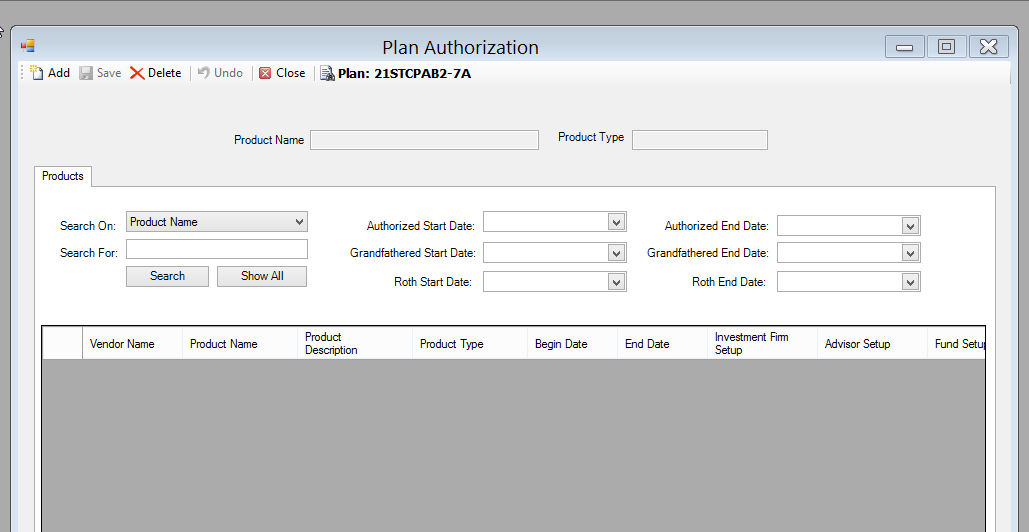
- Click the “Add” button in the upper left corner of the screen.
- Search and select one or more products to add.
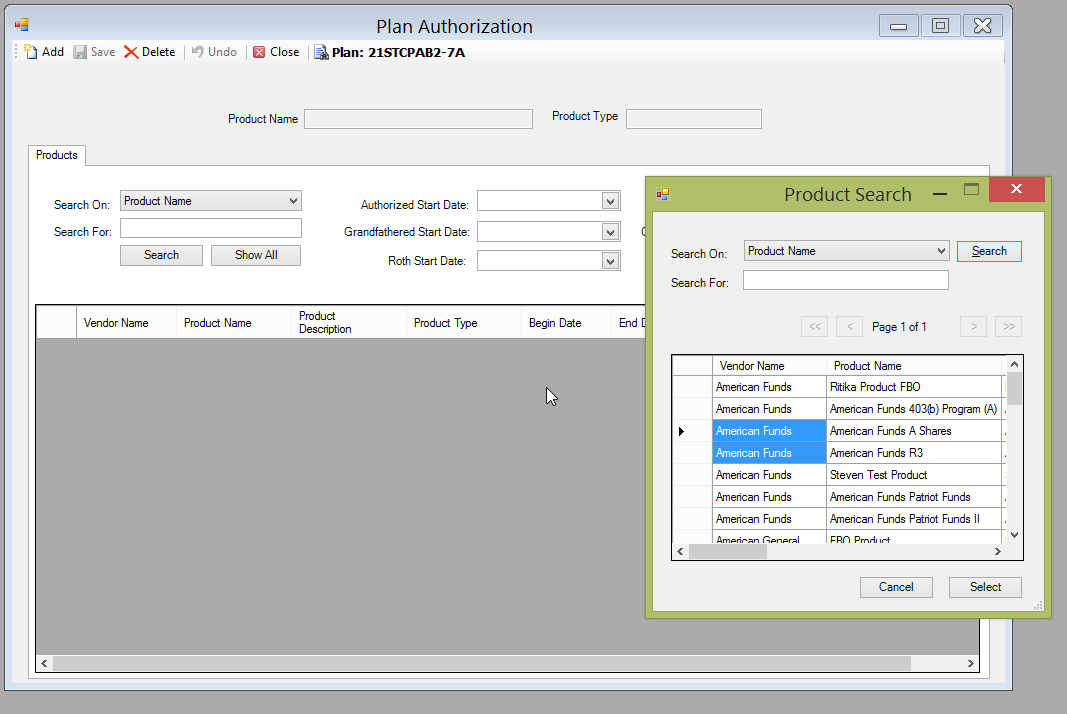
- Click the <Select> button.
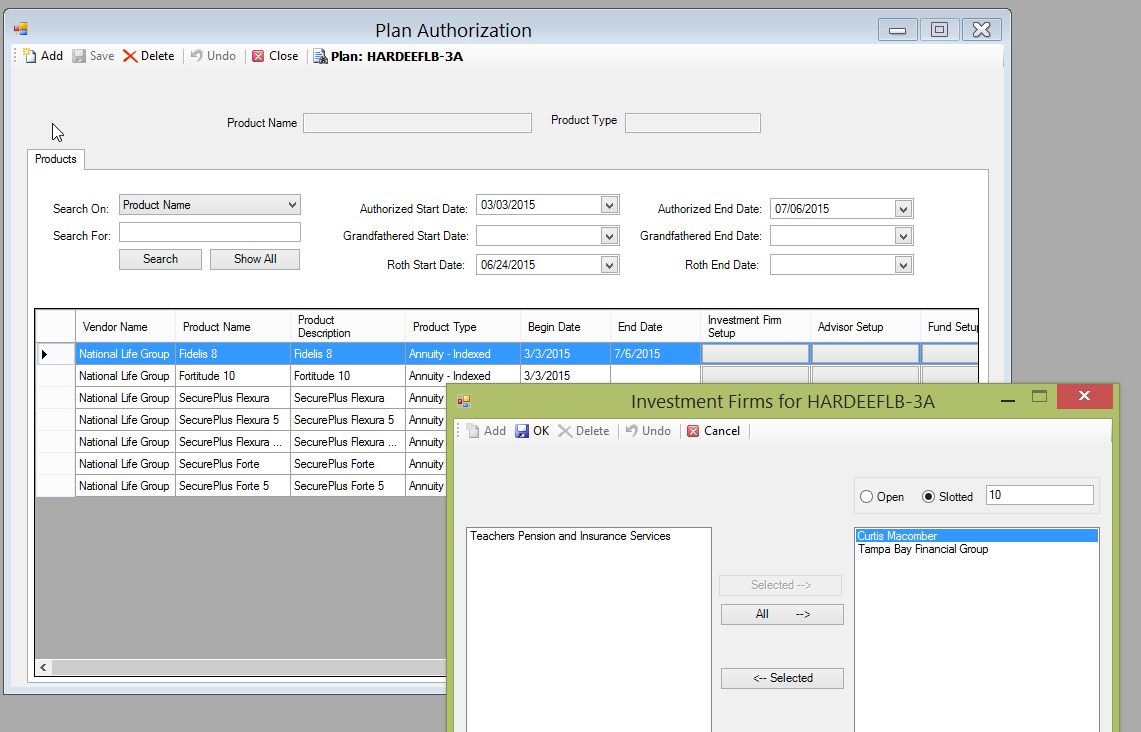
- The next step is setting up the agency/firms that are allowed to sell the products that are approved in the plan. On the same “Plan Authorization” screen, click the [Plan: _____] button at the top of the window and search/select the plan.
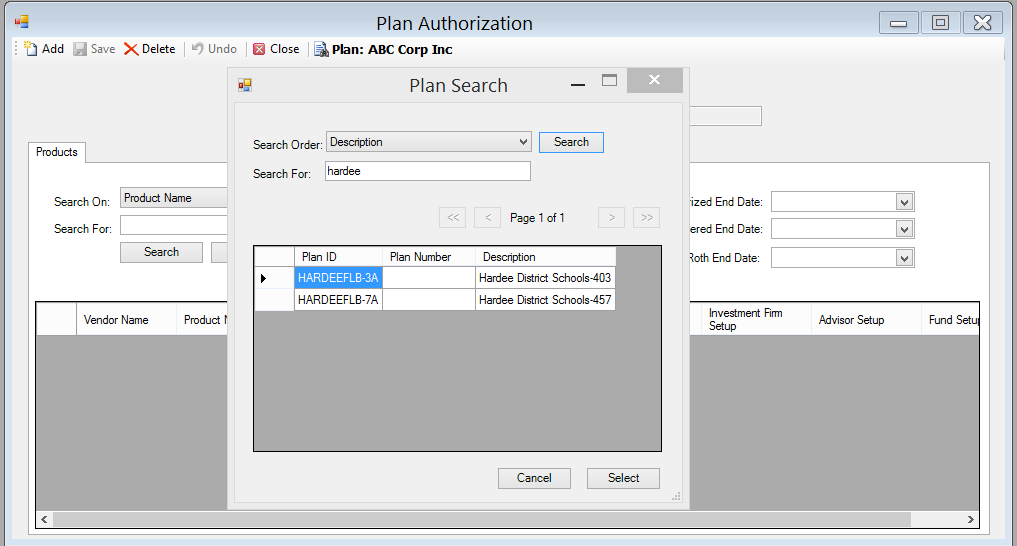
- Click [Select] button to close the Plan Search window. Click the button in the Investment Firm Setup column of the table for the product that you wish to approve a firm for.
- Use the [Selected →] button to approve the agency/firm for the product. Repeat for all products that the agency will sell into this plan.
- Important: Be sure to select the radio dial for either “Open” or “Slotted”.
- Open: All advisors from approved agencies can sell into this plan.
- Slotted: Only selected advisors from approved agencies can sell into this plan. If you click this option, then you will also need to click the button in the “Advisor Setup” column to select the slotted advisors.
- You’re now ready to allow agents to register for this new agency. Provide the agency with the master registration UserID and password created above, and direct them to the IPX login URL to register. Video instructions are here as a reference: https://www.youtube.com/watch?v=VXKEj1MwMPo
- A final important step is to create the house advisor for the account. The house advisor is the default advisor that takes any in-flight business if another advisor leaves the firm.
- Coordinate with the agency/firm to explain the house advisor concept and get their house advisor registered in IPX.
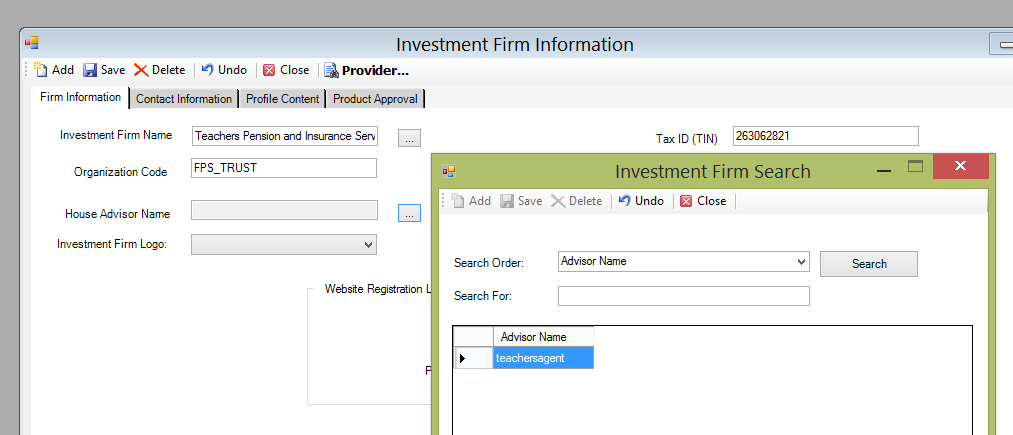
- Go to Setup > Investment Firms > Investment Firm. Click the <…> button by the “Investment Firm Name” field and search/select the firm.
- Click the <…> button by the “House Advisor Name” field.
- Select the house advisor.
- Click the <Select> button.
- You have completed a new investment firm setup!