______________________________________________________________________________________________________________________________________
Job Queues
Use the Job Queues option to retrieve/display reports and download files that are generated as the result of running a specific report or process. All import file processes (Interfaces > Conversion File), reports, trading processes, compliance processing functions and a few transactions (for example, Direct Client Entry Contributions, Earnings, etc.) are processed to the job queue.
Although several reports will display immediately within various menu options, any report that contains too many records or takes longer to run will be available here.
Note: Statements, Register and Register Totals are saved in pdf format and use standard pdf functionality, such as Save and Print.
How to access this option
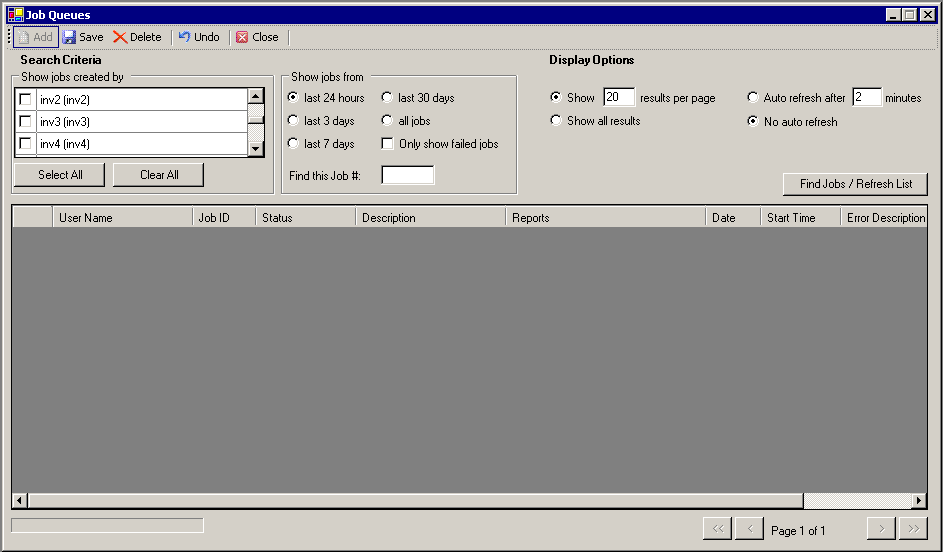
On the File menu, click Job Queues. The Job Queues window displays.
How to View a Report in the Job Queue
1. Specify the search criteria.
Select the check box(es) corresponding to the user(s) who created the job(s) or click Select All to view reports for all users. (If necessary, click Clear All to clear all check boxes.)
Select the time period during which the report ran (e.g. last 24 hours, last 30 days, all jobs). You can also find a specific job by entering the job number in the Find this job # field. In addition, you can view only failed jobs for the selected time period by selecting the Only show failed jobs check box.
2. Specify the Display Options. Enter the number of results to show per page or Show all results.
3. Enter the number of minutes between each auto refresh or select No auto refresh.
4. Click <Find Jobs/Refresh List>.
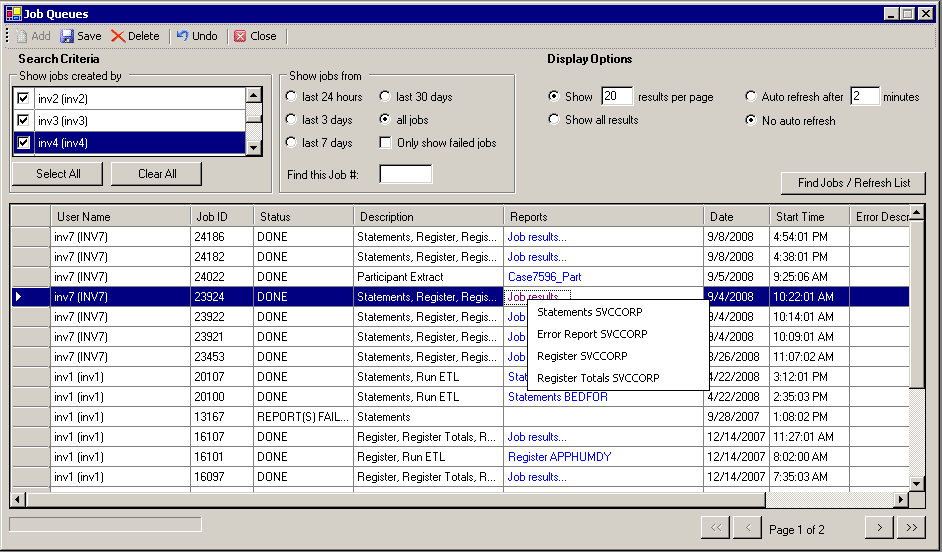
The grid displays the following fields: User Name, Job ID, Status, Description, Reports, Date, Start Time and Error Description (see image below).
5. Click the blue report name link in the 'Reports' column to display the report. A new browser window opens and displays the report.
When the 'Reports' column displays Job results... or any other text, click it to display a list of reports included and then click the desired report to view.
How to Save, Print, Email and/or Edit a Report
1.
Click on the report you
want to save, print, email and/or edit.
A separate window opens displaying the report.

2.
Click the ![]() icon to
save the report file.
icon to
save the report file.
3.
Click the ![]() icon to
print the report file.
icon to
print the report file.
4.
Click the ![]() icon to
email the report file.
icon to
email the report file.
5.
Click the ![]() icon to
edit the report file.
icon to
edit the report file.
How to Delete a Job
1. Click the blank square to the left of the report you want to delete. Make sure the entire row is highlighted (excluding the Reports field).
2.
Click the ![]() icon. The
following confirmation message displays:
icon. The
following confirmation message displays:

3. Click Yes to delete it or No to retain it.
4.
Click the ![]() icon to
confirm the deletion. The following message displays:
icon to
confirm the deletion. The following message displays:
5. Click OK.
Explanation of Fields:
|
Field Name |
Field Description |
|
User Name |
Displays the TSM SmartClient User Id of the person who initiated the job. |
|
Job Id |
The unique
system-generated reference number. |
|
Status |
Once the jobs and/or reports are processed to the job queue, the status is indicated: DONE. Job processing or report generation is
complete. A corresponding report may or may not display in the message box.
For example, the Post Transactions process will not display any reports. FAILED. When a failed status displays, an error occurred during job processing. Please contact your Client Services representative to report the error message and describe the steps taken to run the report and/or process. RUNNING. The job is currently processing or the
report is currently generating. Long run times may indicate that an error has
occurred with the process. Contact Technical Support. WAITING. When the job queue shows a wait status,
there are other reports or processes running ahead of the waiting job. Once
these jobs have completed, the next numbered Job Id in the queue will run.
This process continues in this manner until your Job ID starts to run. If all
jobs are in a waiting status, an error may have occurred with the application
server and you may need to contact Technical Support. |
|
Description |
Displays the menu
option for the report. |
|
Reports |
Displays the name of the report or 'Job Results.' for multiple reports. |
|
Date |
Displays the date the report was generated or the process initiated. |
|
Time |
Displays the time the
report or process started. |
|
Error Description |
Displays the resulting
error message if a job fails. If the user clicks the contents of this cell, a
pop-up box with the message will appear and the user will have placed the
contents in the Clipboard for further action (Cut-and-Paste into Clientele,
etc.). |