________________________________________________________________________________________________________________________________________________________________
Upload
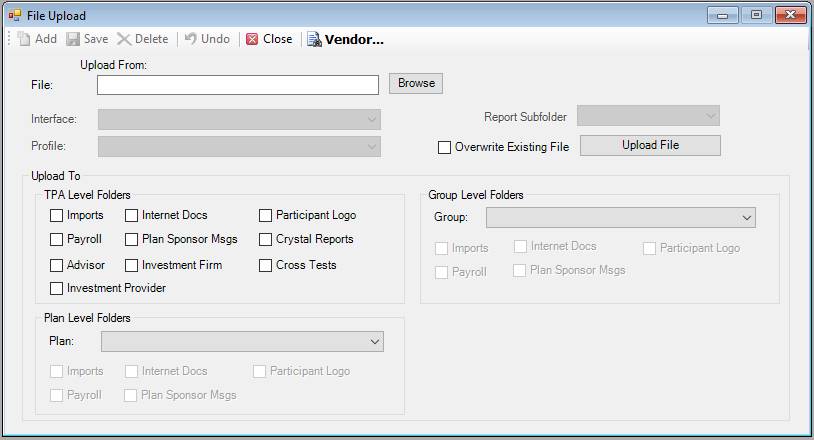
Use the Upload option to upload existing files from your internal Local Area Network or local workstation to various folders within TSM SmartClient.
You can choose from three levels of folders:
· TPA Level Folders: These are global level folders and are available to all plans.
· Group Level Folders: These folders are available to a group of plans. (To set up a new group folder, refer to File menu > Group Folder).
· Plan Level Folders: These folders are plan-specific.
Note:
· Before uploading an interface or conversion file, be sure to create the appropriate Interface Profile.
· You might want to consider creating a file naming convention for those files being uploaded to facilitate recognition of files when processing or retrieval. For example, if a user is going to interface the 12/31/2007 Schwab Dividend file, then the file should be renamed to SCHWAB_20071231DIV prior to uploading.
How to Access this Option:
How to Upload a Data File:
1. Select the desired check boxes within the "Upload To" section.
Note 1: The Payroll folder is used for uploading payroll files and the Import folder is used for everything else, for example, participant demographic information. The remaining options are used for special purposes.
Note 2: Selecting the Imports or Payroll option activates the Interface and Profile fields.
3. Enter the file you want to upload, either by typing the full path, or using Browse to navigate to it.
4. Select the Interface from the list, if required.
5. Select the Profile from the list, if required.
6. Select the Overwrite Existing File check box if you are replacing an old file with a new one with the same name. Otherwise, TSM SmartClient will not be able to upload the file and you will see an error message.
7. Click Upload File. When the upload is completed, the following message displays:
Click OK to close the dialog box.
8. The next step is to run the interface process. See Interfaces > Conversion File or Interfaces > Payroll File.
Explanation of Fields:
|
Field Name |
Field Description |
Required / Optional |
|
Upload From |
The location where the file can be found. Click Browse to search your local network for the file you want to upload. |
Required |
|
Interface |
Select the interface from the list. |
Required if Imports or Payroll is selected. |
|
Profile |
Select the profile from the list. Profiles are created in the Interface > Profile Maintenance option. |
Required if Imports or Payroll is selected. |
|
Report Subfolder |
Currently not used. |
|
|
Overwrite Existing File |
Select this check box to replace the (current) existing file in the folder with the new one. This only applies for files with the same name. We suggest you always select this check box. |
Optional |
|
Upload To |
Choose a folder destination for the upload. TPA Level Folders: Imports: All the files required for interface or conversion processing are stored in this folder. The files will appear on the Interfaces > Conversion File window where the user can select them for the specified Interface Profile. Payroll: All the files required specifically for payroll processing are stored in this folder. Files in this section will appear on the Interfaces > Payroll File window for the user to select for the specified Interface Profile. Internet Docs: All files to be made available either on the participant site or the plan sponsor site. Not used for conversion or payroll files. Plan Sponsor Msgs: This folder contains.htm files. Any messages included here will display on the plan sponsor site. Not used for conversion or payroll files. Participant Logo: A company logo may be used by uploading an image to this folder. The uploaded logo will appear on the welcome page of the participant site. Files are uploaded to the planpics folder on the network. Not used for conversion or payroll files. Note: Crystal Reports, Advisor, Investment Firm, Cross Tests, and Investment Provider check boxes are not used at the present time. Group Level Folders: (same folders mentioned in TPA Level Folders) Group: Browse the file list for the desired group folder. (New group folders may be set up in File > Group Folder.) Plan Level Folders (same folders mentioned in TPA Level Folders) Plan: Browse the plan list for a specific plan name. |
One is required |