Setup Menu
_____________________________________________________________________________________________________
Company
Use the Company option to view/update basic company information, such as the company ID, company name, primary contact, and address. Before you can establish a plan on , the employer (company) sponsoring the plan must be set up. Employers sponsoring multiple plans will use the same company ID.
You can apply the same Company Id to more than one plan, allowing for plan grouping during compliance test processing.
How to Access this Option
On the Setup menu, point to Plans, and then click Company. The Company window displays.

How to Add a Company
In order to add a company, you must upload the EmpInfo-Export file to TSM via the TSM Switchboard.
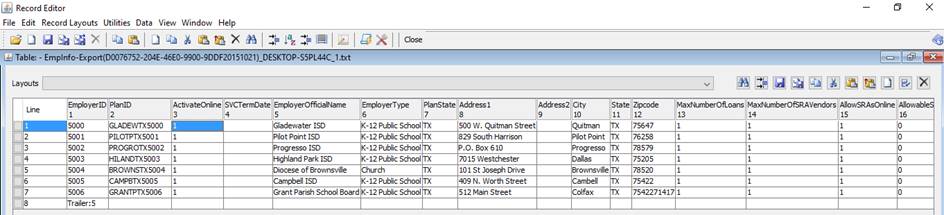
The following is a sample EmpInfo-Export file:
For further instructions on how to setup a new company/Plan, please click the following link:
For further instructions on how to upload files via TSM Switchboard, please click the following link:
How to Delete a Company
Note: You cannot delete a company if there are plans that use it.
1. Display the company you want to delete by typing the Company Id or using the Search function.
2.
Click the ![]() icon. The
following message displays:
icon. The
following message displays:
3. Click Yes to delete this company, or No to retain it.
4. Click the ![]() icon to
close the dialog box.
icon to
close the dialog box.
How to Change a Pre-existing Company Record
1. Display the company you want to change by typing the Company Id or using the Search function.
2. Position the cursor in the field you want to change and make the appropriate changes.
3. When you are done, click the ![]() icon. The
following message displays:
icon. The
following message displays:
Click OK.
4. Click the ![]() icon to
close the dialog box.
icon to
close the dialog box.
5. If you are editing more than one company, repeat steps 1 - 3 for each. When you are done, proceed to step 4.
Note: Some fields cannot be updated directly in TSM. These fields are grayed out (i.e. locked down). Such fields can only be updated by updating the EmpInfo-Export file and re-uploading to TSM via the TSM Switchboard.
How to Undo a Company Record
If you have entered data and realize you want to revert to the
original data, click the ![]() button. Note: This
works only if you have not yet saved your work.
button. Note: This
works only if you have not yet saved your work.
The Company information reverts to the last time the ![]() icon was clicked.
icon was clicked.
Explanation of Fields
|
Field Name |
Field Description |
Required / Optional |
|
Company ID |
Enter a code identifying the company. This field can contain up to a maximum of 12 alphanumeric characters. |
Required |
|
Company Name |
Enter the full name of the company, maximum of 12 characters. |
Required |
|
Primary Contact |
Enter the person's name that will be the main contact with the administrator for this plan, maximum of 30 characters. |
Optional |
|
Address |
Enter the company address. This should be the address where the company is registered, maximum of 30 characters. |
Optional |
|
Address |
Enter additional address information, such as Suite Number, maximum of 30 characters. |
Optional |
|
City |
Enter the city where the company is registered, maximum of 25 characters. |
Optional |
|
State |
From the list, select the state where the company is registered. |
Optional |
|
Zip |
Enter the zip code where the company is registered, maximum of 20 characters. |
Optional |
|
Country |
Enter the country where the company is registered. |
Optional |
|
District Settings |
||
|
External Plan Reference |
Enter the external plan reference id. |
Required |
|
Service Term Date |
Service termination date. |
Optional |
|
Max Num of Loans |
Maximum number of loans allowed. |
Required |
|
Report Manager URL |
Report manager URL. |
Optional |
|
Max Num of SRA Vendors |
Maximum number of SRA vendors. |
Required |
|
Employer Type |
Type of employer, such as Church, K-12 Public School, etc. |
Required |
|
SRA Contribution Method |
Select one of the following options: · Both · Dollars · Percent |
Optional |
|
Allow SRAs Online |
Checking this box will allow participants to enroll in an SRA online. |
Optional |
|
Activate Online |
Checking this box will provide online access to the employer. |
Optional |