Group Folder
Use the Group Folder option to organize files to facilitate uploading and downloading files for multiple plans. For example, a user may create a Group Folder called Payroll Provider XYZ, and assign it to multiple plans to store files received from or sent to that payroll provider.
Note: To make a Plan part of the Group Folder,
select the Group Folder from the list on the Setup
> Plans > Plan - Misc tab.
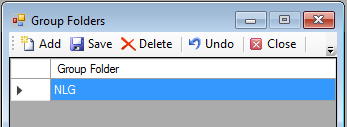
How to Access this Option:
On the File menu, click Group Folder. The Group Folders window displays.
How to Create a Group Folder:
1.
Click the ![]() icon. The Add Group Folder
dialog box displays.
icon. The Add Group Folder
dialog box displays.
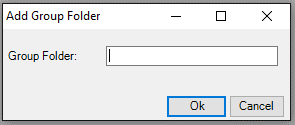
2. Enter the group name in the Group Folder field and then click Ok.
3. Click the ![]() icon. The following message displays:
icon. The following message displays:
Click Ok to close the dialog box.
How to Delete a Group Folder:
1. Highlight the Group Folder record you want to delete.
2. Click the ![]() icon. The following message displays:
icon. The following message displays:
Click Yes to delete it or No to retain it.
3. Click the ![]() icon to confirm the deletion. The following
message displays:
icon to confirm the deletion. The following
message displays:
Click OK.
4. When you are done, click
the ![]() icon.
icon.
5. If you are deleting more than one Group Folder, repeat steps 1 and 2 for each. When you are done, proceed to steps 3 and 4.