How to Set Up Security Rights for a User
Setting up security rights is useful for controlling user access. You can limit the plans, screens, and security levels for a user by selecting a combination plans and Profile. A manager usually sets up users.
Use this procedure to create a new security profile
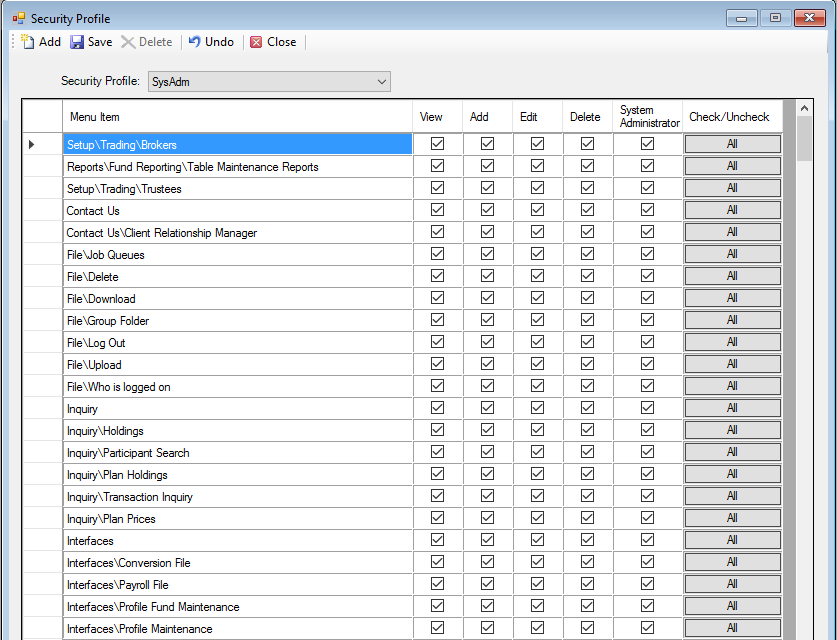
1. Access the Security Profile option. On the Setup menu, point to System, and then click Security Profile. The Security Profile screen displays.

2.
Click the ![]() icon. The New Profile Name dialog box
displays.
icon. The New Profile Name dialog box
displays.
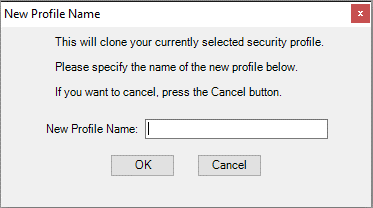
3. Enter a New Profile Name in the field and click OK. This will copy the currently displayed security profile.
4. Choose the level of rights you want to assign to each screen for this profile by selecting the check box(es) that corresponds to the security level, or click All to select all levels. You can select more than one security level. For example, you could limit the 'Clerk' to 'View' and 'Edit' transactions only.
Note: The default System Administrator security level can View, Add, Edit, and Delete all screens.
You can assign View, Add, Edit, Delete, and System Administrator rights for every screen in TSM.
Select:
· View rights to allow the user to view the information on the screen
· Add rights to allow the user to add information to the screen
· Edit rights to allow the user to edit existing information on the screen
· Delete rights to allow the user to delete information currently on the screen
· System Administrator rights to allow the user to perform all tasks and functions on the system. This is the highest security level on the system and is usually given to system administrators only.
5. When you are done, click
the ![]() icon to save the selected information.
icon to save the selected information.
Use this procedure to apply the profile to specific users
1. Access the User Security option. On the Setup menu, point to System, and then click User Security. The Security window displays.

2.
Click the ![]() icon.
icon.
3. Select the Type from the list.
4. Complete the following required fields: ID, Name, and Password. The user needs the ID and Password to log on to TSM.
5. Select the Profile from the list.
6. Select the Plan(s) that the user can have access to by highlighting the Plan(s) in the Available list and then clicking Move. You can give the user access to all Plans by clicking Move All.
7.
When you are done, click the ![]() icon.
icon.