Setup MenuSystem
Use the User Security option to create a new user so that he or she may log on to TSM SmartClient and/or the Plan Sponsor Site. You can also establish the security access rights for each user pertaining to plans in TSM SmartClient and the Plan Sponsor site. You may create unlimited levels of security using the Security Profile option.
The combination of the selected plans, along with the profile, will limit the user's access to the plans, and then to the windows and security levels for those windows.
See Also: How to Set up Security
Rights for a User
How to access this option
On the Setup menu, point to System, and then click User Security. The Security window displays.
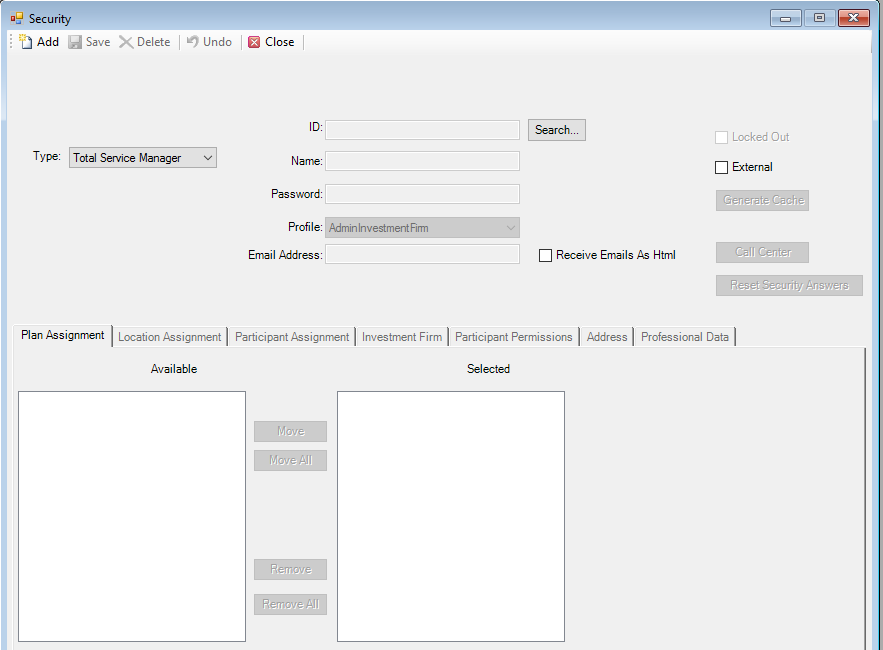
How to Create a New User (Total Service Manager or Plan Sponsor)
- Select the Type of system for which you are setting up the User Security record (i.e. Total Service Manager or Plan Sponsor Site). Note: You must define separate security access levels for each system type.
- Click the
 icon.
icon.
- Enter an ID (identifier) for this user. The user will use this ID when logging on to TSM SmartClient.
- Enter the user's Name.
- Enter the initial logon Password. This is the password the user will enter the first time he/she logs on.
- Select the security Profile from the list. This limits the options the user can access and the rights enabled for the options.
- Enter the user's Email Address. Note: This is a required field.
- Go to the Plan Assignment tab and assign the Plan(s) this user will be able to access. Note: You must select at least one Plan.
- If a Type = Plan Sponsor Site was selected, go to the Location Assignment tab and assign the relevant location(s). Note: You must select at least one location.
- When you
are done, click the
 icon. The following message displays:
Click OK.
How to Create a New User (Advisor)
- Select Advisor as the Type of system for which you are setting up the User Security record.
- Select a Sub Type (i.e. Governing or IPX Distributor).
- Click the icon.
- Enter an ID (identifier) for this user. The user will use this ID when logging on to TSM SmartClient.
- Enter the user's Name.
- Enter the initial logon Password. This is the password the user will enter the first time he/she logs on.
- Select the security Profile from the list. This limits the options the user can access and the rights enabled for the options. Note: This is a required field. You should choose a profile with limited permissions (i.e. “AdminInvestmentFirm” or one of the “RecordKeeper” profiles).
- Enter the user's Email Address. Note: This is a required field.
- Enter the user’s SSN (social security number). Note: This is a required field.
- Select the Active check box to indicate the user is currently active. (If the user is not currently active, do not select the Active check box.)
- Click on the Investment Firm tab and assign one or more Investment Firms the user will be associated with.
- Click on the Address tab and enter the user’s information. Note: Required fields are marked with an asterisk.
- Click on the Professional Data tab to enter additional optional information about the user.
- When you
are done, click the icon. The following message displays:
Click OK.
Explanation of Fields:
|
Field Name |
Field Description |
Required / Optional |
|
Type |
Select the type for which you are establishing
the user profile. Select either Total Service Manager, Plan Sponsor or
Advisor. Separate profiles must be set up for each site. |
Required |
|
Choose Sub Type |
Select either Governing or IPX Distributor. This field is only visible when Type=Advisor is selected. |
Required when Type=Advisor is selected |
|
ID |
Enter a unique user identifier of up to 18 alpha/numeric characters. No two IDs may be the same. TSM SmartClient will validate for duplicate IDs. |
Required |
|
Name |
Enter the full name of the user, maximum of forty (40) characters. |
Required |
|
Password |
Enter the initial logon password for the user ID. The password must be 8 to 16 alpha-numeric characters long, and it must contain at least one alphabetical character, at least one number, and at least one special character. This is an encrypted field. Therefore, it will be displayed as asterisks (*) when typing in this field. |
Required |
|
Profile |
Select the profile defining the type of access allowed from the list. Additional profiles may be created in the Setup > System > Security Profile option. |
Required |
|
Email Address |
Enter the email address of the user. |
Required |
|
Receive Emails as Html |
Select this check box if the user wants to receive emails in html format. |
Optional |
|
Locked Out |
TSM SmartClient will automatically select this check box if a user has attempted to log on to TSM SmartClient 3 times unsuccessfully. In addition, you can manually lock (or unlock) the ID to completely disable (or restore) the user's access to the TSM SmartClient system and data resources. |
Optional/Informational |
|
External |
Select this check box to designate the user as an external user. External users are typically granted limited access according to the profile established in the Setup > System > Security Profile option. window functionality, such as View but not Process, may be restricted when this check box is selected. |
Optional |
|
SSN |
Enter the social security number of the advisor. This field is only visible when Type=Advisor is selected. |
Required when Type=Advisor is selected |
|
Active |
Select this check box if the advisor is currently active. This field is only visible when Type=Advisor is selected. |
Optional when Type=Advisor is selected |
|
Generate Cache |
This button is only accessible when Type=Plan Sponsor or Advisor is selected. |
Optional when Type=Plan Sponsor or Advisor is selected |
|
Call Center |
Click this button to go to the advisor’s/agent's IPX screen (AWEB). This button can be used to emulate an advisor/agent and perform tasks on their behalf. This button is only accessible when Type=Advisor is selected |
Optional |
|
Reset Security Answers |
Click this button (and then click the |
Optional when Type=Plan Sponsor or Advisor is selected |