Vesting
Use the Vesting option to establish vesting schedules as defined by the plan for all money types subject to a vesting schedule. Vesting schedules apply only to employer related sources, such as employer match and profit sharing accounts. Employee sources, such as pre-tax, after-tax, and Roth accounts, are always 100% vested. Additionally, certain employer sources, such as safe harbor account balances and qualified non-elective contributions made due to a failed ADP test are also 100% vested at all times. You may set up "Vesting Related" sources in the Contribution Sequence option. TSM SmartClient then determines a participant's vested percentage for that source based on the vesting schedule set up for that particular contribution type. It also takes into account prior distributions already paid to the participant.
Since different types of employer money can be subject to different vesting schedules, it is possible that you will need to establish more than one vested schedule. Plans that are deemed top heavy will be subject to an accelerated vesting schedule that allows a participant to be fully vested either after three years, using a cliff vesting schedule, or after six years, using a graded vesting schedule. For additional information on vesting related topics, please refer to the plan document.
To use the Vesting option, you must complete the vesting tab on the Plan window. TSM SmartClient calculates the available vested amount using the following formula: [(market value + prior withdrawals) * vested%] - prior withdrawals = available vested amount
Troubleshooting: If it appears as though vesting is not working properly, first determine if the participant in question has taken any loans or withdrawals in the past.
See Also: How to Set Up an Alternate Vesting Schedule
How to Access the Vesting Screen
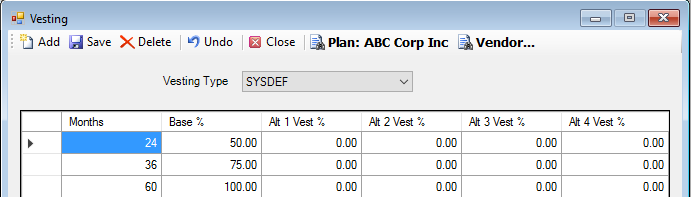
On the Setup menu, point to Plans, and then click Vesting. The Vesting window displays the SYSDEF vesting schedule.
How to Create a Vesting Schedule
1. Select the Plan.
2. TSM SmartClient uses SYSDEF as the default. If desired, select a different vesting type from the list. The vesting types that display are defined as Vesting Related on the Contribution Sequence window. This is a required field.
Note: SYSDEF is the default vesting schedule and should always be defined first. If your plan has more than one vesting schedule, TSM SmartClient will use SYSDEF when the referenced vesting record does not exist. For example, if TSM SmartClient looks for the vesting percentage for MATCH, and the match record has no values defined, TSM SmartClient assumes you want to use the SYSDEF record. The class vesting record is typically used for non-qualified class year Plans. In these cases, sources vest based on the year in which they were contributed. The year is defined in the Class Year field on the Contribution Sequence window.
3. Enter the vesting schedule in months. This is a required field.
4. Enter the corresponding vesting percentage listed for each time period entered in the Months field in the Base % field. This is required field.
5. Enter an alternate vesting percent in any of the next 4 fields. These fields are used in conjunction with the Setup > Participants > Alternate Vesting option. They are optional fields.
6. Click Add to add a new row, if desired.
7. When you are done, click the Save icon.
How to Delete a Vesting Record
1. Highlight the record you want to delete.
2. Click the Delete icon. The following message displays:
Click Yes to delete the vesting record, or No to retain it.
3. Click the Save icon to confirm the deletion. The following message displays:
Click OK.
4. When you are done, click the Close icon.
5. If you are deleting more than one vesting record, repeat steps 1 and 2 for each. When you are done, proceed to steps 3 and 4.
How to Change a Pre-existing Vesting Record
1. Position the cursor in the field you want to change.
2. Click in the field with the left mouse button to highlight the existing value.
3. Enter the new value. You may also use the up/down arrows to select the new value.
4. When you are done, click the Save icon. The following message displays:
Click OK.
5. Click OK to close the dialog box.
6. If you are editing more than one vesting record, repeat steps 1 - 3 for each. When you are done, proceed to steps 4 and 5.
How to Undo a Vesting Record
If you have entered data and realize you want to revert to the original data, click the Undo button. Note: This works only if you have not yet saved your work.
The vesting record information reverts to the last time the Save icon was clicked.
Explanation of Fields
|
Field Name |
Field Description |
Required / Optional |
|
Vesting Type |
Select a vesting type from the list. Vesting types are defined in the Contribution Sequence option (the Vesting Related field must be selected). Note: Since TSM SmartClient displays the SYSDEF (default) automatically, you should define this vesting type first. It should represent the vesting schedule for all employer sources or there will be distinct ones for each source. So in either event, however many schedules the plan defines is what should be defined on TSM SmartClient. When you have a plan that has two or more different vesting schedules, first set up the default schedule. The default schedule will be used when a reference to a particular vesting record does not exist. For example, if TSM SmartClient looks for the vesting percentage for MATCH, and the match record has no values here, TSM SmartClient assumes you want to use the SYSDEF record. The class vesting record is typically used for non-qualified class year plans. In these cases, sources vest based on the year they were contributed. The year is defined in the Class Year field on the Contribution Sequence window. See Also: Setup > Plans > Contribution Sequence |
Required |
|
Months |
Enter the number of months that represent each year of service in the vesting schedule. For example: A 3 year cliff vesting schedule would have 12 months for the first year of service, 24 months for the second year, and 36 months for the third year. A year of service for vesting purposes is defined on the Setup > Plans > Plan - Vesting tab. |
Required |
|
Base % |
Enter the corresponding vesting percentage listed for each year of service entered in the Months field. |
Required |
|
Alt 1 Vest % |
Enter the alternate vesting percent. This field is to be used in conjunction with the Setup > Participants > Alternate Vesting option. |
Optional |
|
Alt 2 Vest % |
Enter the alternate vesting percent. This field is to be used in conjunction with the Setup > Participants > Alternate Vesting option. |
Optional |
|
Alt 3 Vest % |
Enter the alternate vesting percent. This field is to be used in conjunction with the Setup > Participants > Alternate Vesting option. |
Optional |
|
Alt 4 Vest % |
Enter the alternate vesting percent. This field is to be used in conjunction with the Setup > Participants > Alternate Vesting option. |
Optional |